That is the 'feeling' I was going for with this picture.
I wanted to fade most of the color out, leaving behind just the things I wanted. This looks really complicated doesn't it?
Guess what? It is easy in Picnik. www.picnik.com
Picnik is an exceptionally easy to use online photo editing application. It is the easiest way on the Web to fix underexposed photos, remove red-eye, or apply special effects to your photos - right in your browser. Keep in mind that you will need a high speed connection to work in Picnik.
What can you do with Picnik? Pretty much everything. It has amazing edit tools that can fix just about anything that can possibly go wrong with a photograph. Don't have oodles of photo editing knowledge? No problemo! Many of the tools are one-click fixes, including auto-fix, exposure, colors, and red eye. Many others such as rotate, crop, resize and sharpening can be controlled with easy to use sliders.
You can experiment with many custom-made effects, most of which have the ability to be painted into just the areas of your image you want. There is a great text tool, customizable frames, touch up tools and advanced editing tools.
I have been struggling to save all my unemployed pennies for Photoshop and the new computer I need to actually run the program. It is a significant financial investment, combine that with the classes and months of practice learning the program - it is all rather daunting. One day, hopefully, I will get there... till then there is Picnik. I have had a blast using Picnik and finding new and interesting uses for their existing tools.
This will be the first in a series of 'tutorials' featuring screen shots for you to print, so you too can follow along to achieve the same results in 12 easy steps. Future tutorials will not be as lengthy as this one. The target audience for this tutorial is a beginning Picnik user.
In this tutorial we are going to work with textures, painting black and white, painting color into eyes, and other effects to achieve the end result.
First we start with the straight out of the camera shot. Please feel free to right click on this image and save it to your computer. If you have the premium Picnik membership ($24.95 for one year) you can upload it then follow along and edit this photo with me.

Here is a link to the photo on my Flickr account. If you are signed in you can save the original sized file.
http://www.flickr.com/photos/bcxfour/4680030494/
You will also need to obtain a texture from Flickr. You can find the texture I used in this photo here:
http://www.flickr.com/photos/emeraldrose/2849482017/in/faves-bcxfour/
Right click on the texture, save image to your computer. Then upload to Picnik for use later.
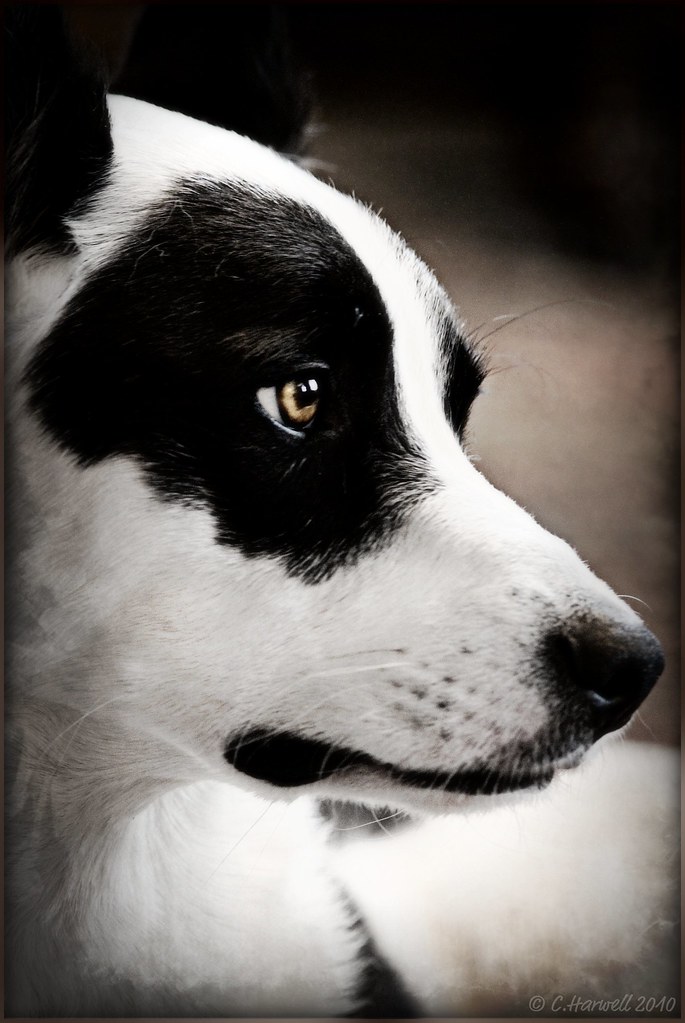
Why did I want to edit this photo? I loved Ranger's expression and the light in his eyes was very pretty. At first glance this photo looks decent. But on closer inspection I can see that his eyes are not as sharp as I would like (shaky hand). His white fur has taken on a decidedly yellow cast (white balance issues) and there is quite a bit of grainy 'noise' (fuzz) in the back ground because my ISO settings were too high.
I decided to work with the ISO noise by changing the 'era' of the photo. Old black and white (B&W) photos tended to be 'grainy'. By utilizing the 'gritty' feature it would help with the out-of-focus problem near his eyes. Finally B&W would remove the yellowish appearance to his fur.
Lets get started.
1. Upload your picture to the library. Then open it for editing.

2. In the Edit tab, click on Auto-Fix. Let it do it's magic. Note: Sometimes I will use the Auto Fix tool and not like the results. If that happens I *undo* then adjust the exposure and color manually. You can do that by clicking on Exposure and Color.
**Try it...play with them and have fun. See what happens to your photo. You can always UNDO.**
3. Next we want to help the sharpness, out-of-focus problem around Ranger's eyes. Zoom in on the photo by using your mouse wheel or clicking on the zoom icon in the bottom right hand corner of the application background.
In the Edit tab click on SHARPNESS, then ADVANCED. This will bring you to the UNSHARP MASK. I raised the radius up to 1.6 and the strength to around 40% or so. (Play with these sliders...see the effects they have on the picture).

4. EYE BRIGHT - click on the CREATE tab, then click TOUCH UP on the tool bar. A new set of tools will load on the left. Scroll down until you find EYE BRIGHT. Click on it.

Now your mouse will turn into a circle - this is your EYE BRIGHT brush. You can control the size of your brush by moving the brush slider left or right. I prefer to have my brush smaller than my eye so I can selectively adjust parts of the eye - for this I had my brush set at 60. In Ranger's eyes I dragged the tool over the entire surface, but stayed off the white of his eye, just the iris and pupil.
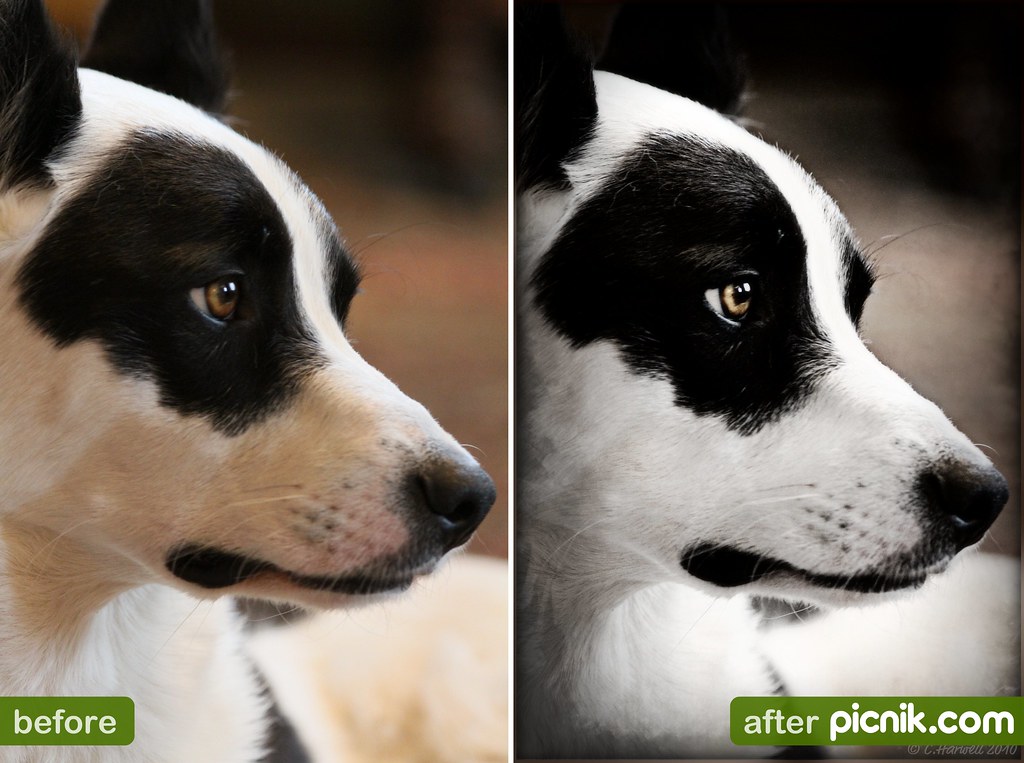
In the next screen shot you can see the 'after'. See how the light in his eyes seems just a smidge brighter? The black darker? The catch lights are nicely sharpened. If you want a more dramatic effect adjust the FADE and LIGHTEN sliders...see what happens!

**Play with this brush a bit, drag it over the eye, see what happens. Now drag it over the fur, what are the results? Experiment & Undo**
5. Painting BLACK & WHITE. For the next effect we are going to move over to the CREATE tab. The first effect is BLACK & WHITE. Click on it. Your entire picture will suddenly turn black and white.
Do.Not.Panic.
Calmly click on the PAINT BRUSH to the right of the FADE slider. Another little box will open, now check the box in front of REVERSE EFFECT.

Viola! Your color should have returned to the picture. Next, see the BRUSH SIZE slider? Slide that over to above 200, now your paintbrush is large enough to cover a nice sized surface. By holding down your mouse you can drag the brush over all over Ranger's white fur. Do not touch his eyes or the back ground of the picture. Concentrate on the white fur that has a 'yellowish' cast. I took my 'painting' down his neck a tad.

Try moving the slider back and forth, see what happens.
In the above screen shot you can see the effect has been applied to 50%. The yellowish/dirty cast on his face is reduced leaving behind a gray shadow.
**TIP: If you have a small area of white fur you would like to remove dirt from, or any other discolorations check out the TOOTH WHITEN tool under CREATE / TOUCH-UP. Paint the TOOTH WHITEN brush on the fur you wish to whiten - fade to match the other white. Play with it, see what happens!**
6. GRITTY Effect - Since my photo is already kinda 'gritty' because of the noise my high ISO left behind - I decided to work with it, capitalizing on what is already there. Old time photo's were not smooth and soft like our modern pictures. By putting some grit into your photo it gives it a more realistic period appearance.

In the same CREATE tab, under EFFECTS you will find the GRITTY effect. Click on it. I adjusted the darkness to 40% and faded it 57%. These numbers are not that important - play with them, see what looks good to you.
*TIP* Anytime you are unsure of a tool's function - click on the ? icon. An informative window will pop up to answer your questions.
7. HOLGA-ISH - now we are getting into the fun stuff. HOLGA-ISH is above the GRITTY effect under CREATE / EFFECTS. Click on it.
WHOA! What just happened to your picture? Dude!
Again...Do.Not.Panic.

HOLGA-ISH mimics the effect of the old time Holga camera. Since we already applied GRITTY slide the GRAIN slider down to 1%.

Next I faded it to 47% allowing 53% of the original photo to show through the effect. This left a hint of color in the background and his eyes were still a nice shade of gold. What I really like about HOLGA-ISH is the way it injects light into the center of the photo and applies a slight blur/vignette around the edge. I rarely use it at full strength. Combined with other effects you can make some truly stunning photos. The trick is to not over process - and distract from your subject matter. Something I struggle with every day.
8. Applying TEXTURES! I love textures - they are a fun way to apply different moods and feelings to your pictures. Take your Photo from 'meh' to YEAH! You can use textures to hide icky backgrounds, or make a plain photo fun, creative and exciting.
Down in the left hand corner of your browser you will see PHOTO BASKET. Click on the diamond/triangle thingy so the basket will pop up. You have several places you can choose to access photos, such as your Library uploaded from Your Computer, Flickr, Photobucket, Picasa, etc.
In this case I already had a texture uploaded to my library. You can find free textures online in various resources. I like to find mine on Flickr (search Free Textures). Just make sure you respect the rights & requests of the artists who are sharing them.

When you locate the texture you wish to use, drag it up to your photo.

After you place it on your photo you can then resize and rotate it to fit over your photo. Play with this - it can be as large or small that you wish.

As you begin to manipulate the texture the PHOTO PROPERTIES window opens up. This allows you to control the properties of the photo on the top. More options are available for multiple photos/layers by right clicking on the photo.

Get your texture positioned so you can see just the edge of the black frame around Ranger. Like the screen shot below.

Now you will use the PHOTO PROPERTIES window. See ADVANCED BLEND MODES? Open that drop down menu. Hover your mouse above each selection - watch the effect on your photo. Fun huh?
For this texture I selected OVERLAY

OVERLAY looked the best to my eye. MULTIPLY looked promising but OVERLAY lit up the center of my photo in a manner I liked.
Next FADE the texture to 50%. Here is another opportunity to play with the slider - see what you like.

10. The next handy dandy tool I use often is EYE COLOR. The texture seemed to take some of the color out of Ranger's gold eyes. If you got a little heavy handed with the Black & White or maybe you want to change someone's eye color you can do that here.
Click on EYE COLOR, select the color you want to use, then carefully paint it in over the iris of the eye. You can control the saturation by adjusting the FADE slider. In this case I selected Brown, then faded it 66%. Be careful you do not paint the color over the white catch lights - the results are decidedly icky.

11. Apply your frame. For this one I chose the MIRRORED FRAME. I made the thickness 11, Polish 4% and selected a color from my photo back ground as the tint. Click on the color box which will open the color selections available. Then hover your mouse over the area of the photo you want to match - then click. That color will now be in your frame. Easy Peasy!

12. Finish off your photo by applying your signature. You can do that in TEXT.

Resize it and place it where you want. I fade my color so it wont be glaring.

Congratulations! You are DONE!

Now post your photos and share then with me in the comments! If you have any other tips or requests for things you would like to see please let me know.
Enjoy!


14 comments:
Wow, I'll have to come back when I have lots of time to work through that. Thanks for all the effort you put in to try and help us amateurs out.
I said I was going to bed early tonight, but I have just spent ages trying to make my first ever movie. A lot of trial and error as I figured things out, and then tried to remember how I got there when I wanted to do the same thing again. Hopefully to be posted later today.
Good night!
Wauw its a big divrent lots of work....i think,but love to see how it works.And going to bey some time.If i can find a shop.
byebye,Lean.
ME AND MY DARN SLOW INTERNET CONNECTION!!! I really love Picnik, but it's not wort it for me to go pro because my computer stops responding as soon as I load something new. Grr. You did a great job with Ranger, though!
I tried my best with what I had... that is the free picnik. You can see what I did here: http://ghfsheepdogs.blogspot.com/2010/06/sheila-gets-picnik.html
Did I overdo the blur?
Greenhill Farm - I dont think you did at all! Looks great!
Great tutorial! I'm not a huge fan of Picnik, but I've only played with the Facebook version.
Have you ever tried using Gimp? It's an open-source (Read: FREE) program that has almost as many features as Photoshop. Plus, even if you switch to Photoshop later on, fluency in Gimp will make your learning curve a lot less steep.
Piebald-
I downloaded GIMP and tried to use it. The learning curve is STEEP. I have read tutorials for it, tried and tried. Something about it leaves me dazed and confused. I am an instant gratification kind of person - I want it quick and easy. Picnik does that for me. :)
-Carolynn
Looks interesting :-)
Wizz
Holy awesome job, Batman!
I will be back this weekend when I have time to work through this. Thanks for the tutorial!
What a very good post.I think lot of people will get more information from your post.
Love Love Love this tutorial!! Thank you so much for taking the time to show us how you did it step by step! I have been using picnik for a few months now but wished that they had more tutorials on their site to help those of us who are still learning. So I really appreciate you helping me out and your picture turned out awesome. What beautiful dogs you have. I am starting a new camera budget and after looking through some of your photos I can’t help but be impressed by you pictures. What kind of camera do you use?
Janeil
LOVE what you have done!! Thanks so much, I'm going to try it, LOVE picnik!!
This is great. I'm fairly new to Picnik and I'm really enjoying learning all the cool stuff. I'd never figure this all out on my own. Will you do more tutorials?
Post a Comment